1. ROS2 Nodes

- Subprograms in your application, responsible for only one thing
- Combined into a graph for similar for nodes
- Communicate with each other through topics, sevices, and parameters
Benefits
- Reduce code complexity
- Fault tolerance
- A critical node running your hardware that is well tested and you just add another new node in your program. Even if this later on node can rush, it will not affect the critical hardward node.
- Each of node in Python and node in C++ can communicate without problem
- you could choose to develop your entire application in Python while some nodes will be written in C++ because they need fast execution speed node that two nodes can’t have same name.
- Create node
      <bash />


      cd ~/ros2_ws/src/my_py_pkg/my_py_pkg
touch my_first_node.py
you can edit the my_first_node.py in VSCode [Path: my_py_pkg/my_py_pkg/my_first_node.py]
- Basic code for ros2 communication in python
      <python />


      # my_first_node.py
#!/usr/bin/env python3
import rclpy
from rclpy.node import Node
def main(args=None):
    rclpy.init(args=args) # initialize ros2 communication in python
    node = Node("py_test") # create Node("Your node's name")
                            # Node's name shouldn't be the name of the file
    node.get_logger().info("Hello ROS2") # print something
    rclpy.shutdown() # shutdown ros2 communication
if __name__ == "__main__":
    main()
- launch the code
<bash />chmod +x my_first_node.py ./my_first.node.py
you can see the next picture
[INFO] [time stamp] [name of Node] : print something
- spin function
      <code />


      #!/usr/bin/env python3
import rclpy
from rclpy.node import Node

def main(args=None):
    rclpy.init(args=args) # initialize ros2 communication in python
    node = Node("py_test") # create Node("Your node's name")
                            # Node's name shouldn't be the name of the file
    node.get_logger().info("Hello ROS2") # print something
    rclpy.spin(node) # allow your node to continue to be alive (important code)
    rclpy.shutdown() # shutdown ros2 communication
if __name__ == "__main__":
    main()
spin is important. because you will add subscriber and publisher for communication later
- How to install the file in your workspace
you can use more functionalities if you install the file and you will see the benefits a little bit later
you have to set up setup.cfg, which will tell where you will install the file.
and to install the node, you will add a new line in setup.py
and that executable will be installed in the install folder of your ros2 workspace
      <bash />


      cd ~/ros2_ws
colcon build --packages-select my_py_pkg
      <bash />


      source ~/.bashrc # to source your workspace (or else you will have an error)
- Actually you will use this code to launch the node
      <bash />


      # in another terminal
ros2 run my_py_pkg py_node
!Notation
py_node : executable name
py_test : name of node
my_first_node : .py file name
you should create different name above those
- More scalable ros2 : Oriented Object Programming
- Basic code
      <python />


      #!/usr/bin/env python3
import rclpy
from rclpy.node import Node

class MyNode(Node):     # it is basic node code, you can customize your node you want

    def __init__(self):
        super().__init__("py_test")
        self.counter_ = 0
        self.get_logger().info("Hello ROS2")
        self.create_timer(0.5, self.timer_callback)

    def timer_callback(self):
        self.counter_ += 1
        self.get_logger().info("Hello " + str(self.counter_))

def main(args=None):    # you will always use this basic code
    rclpy.init(args=args) # initialize ros2 communication in python
    node = MyNode()
    rclpy.spin(node) # allow your node to continue to be alive (important code)
    rclpy.shutdown() # shutdown ros2 communication
if __name__ == "__main__":
    main()
2. OOP Python Code Template for Nodes
      <python />


      #!/usr/bin/env python3
import rclpy
from rclpy.node import Node


class MyCustomNode(Node): # MODIFY NAME
    def __init__(self):
        super().__init__("node_name") # MODIFY NAME


def main(args=None):
    rclpy.init(args=args)
    node = MyCustomNode() # MODIFY NAME
    rclpy.spin(node)
    rclpy.shutdown()


if __name__ == "__main__":
    main()
3. In C++
- Create new ‘c++’ packages
      <bash />


      ros2 pkg create [name] --build-type ament_cmake --dependencies rclcpp #c++
- Create node
      <bash />


      cd ~/ros2_ws/src/mym_cpp_pkg/src
touch my_first_node.c
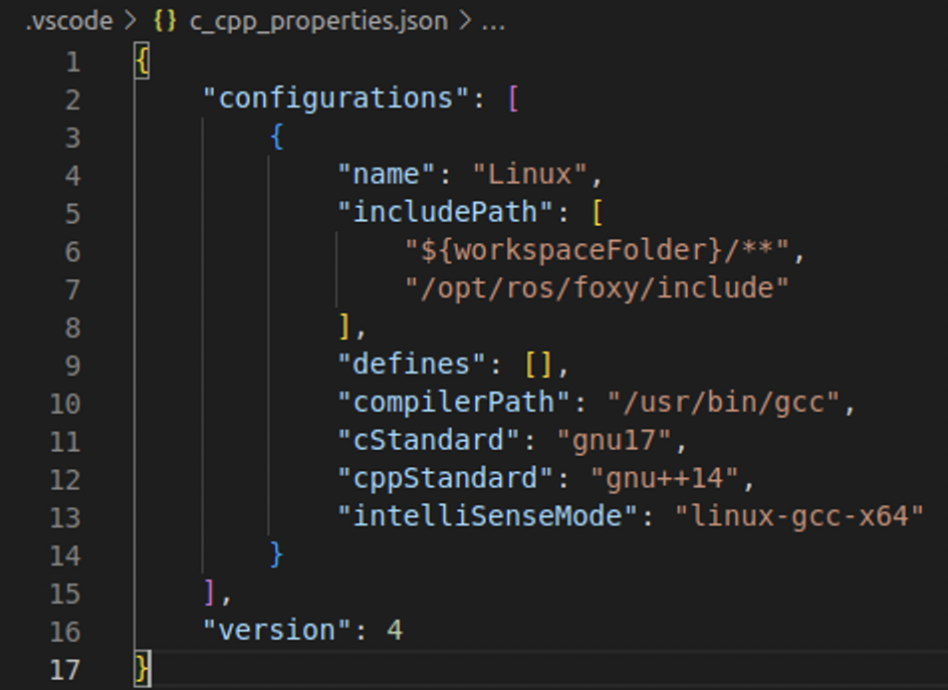
To solve the warning line, you need to add the path manually. Because VScode doesn’t know the path
Press Shift+Ctrl+p and Click above picture

Move global ros2 intallation folder
      <bash />


      cd /opt/ros/foxy/include
you can see h, hpp file in here
So you should add the path in “includePath”
- Basic code
      <cpp />


      #include "rclcpp/rclcpp.hpp"

int main(int argc, char **argv)
{
    rclcpp::init(argc, argv);
    // shared pointer is important, because you don't need to use new and delete manually
    auto node = std::make_shared<rclcpp::Node>("cpp_test");
    RCLCPP_INFO(node->get_logger(), "Hello Cpp Node");
    rclcpp::spin(node);
    rclcpp::shutdown();
    return 0;
}
- Compile and install
Delete the lines in CM
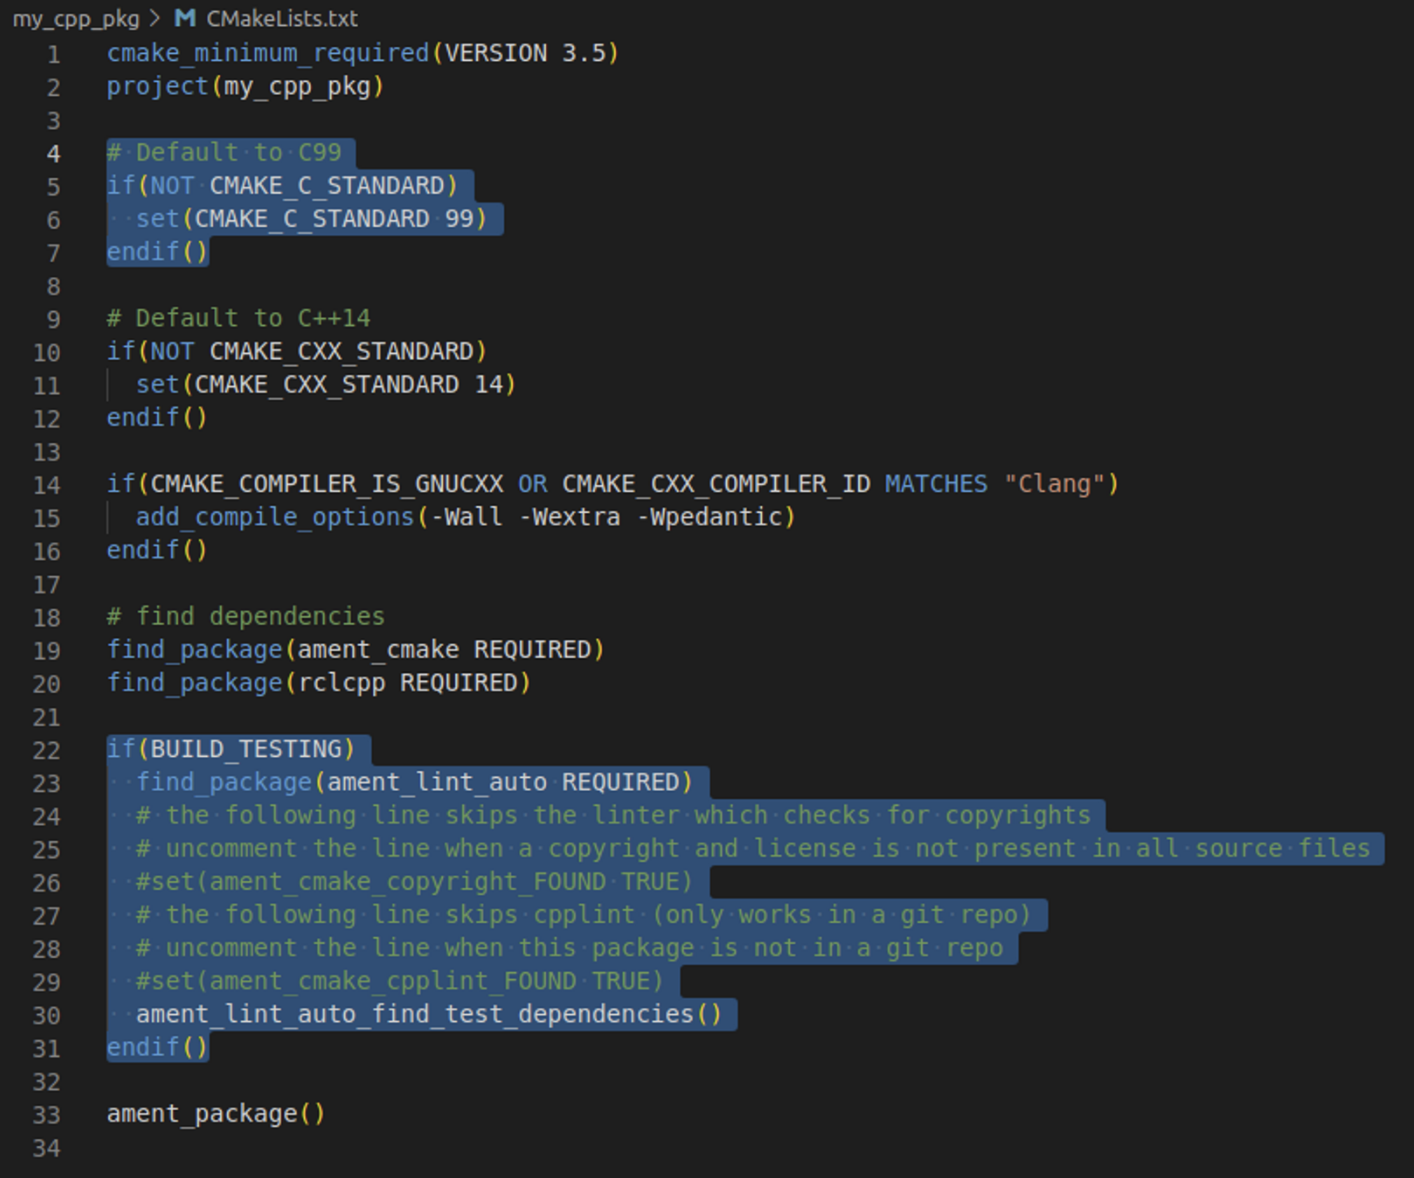
add lines
      <shell />


      cmake_minimum_required(VERSION 3.5)
project(my_cpp_pkg)

# Default to C++14
if(NOT CMAKE_CXX_STANDARD)
  set(CMAKE_CXX_STANDARD 14)
endif()

if(CMAKE_COMPILER_IS_GNUCXX OR CMAKE_CXX_COMPILER_ID MATCHES "Clang")
  add_compile_options(-Wall -Wextra -Wpedantic)
endif()
r
# find dependencies
find_package(ament_cmake REQUIRED)
find_package(rclcpp REQUIRED)

# ---------------add lines-----------------
# create executable
add_executable(cpp_node src/my_first_node.cpp)
ament_target_dependencies(cpp_node rclcpp)

# install in workspace
install(TARGETS
  cpp_node
  DESTINATION lib/${PROJECT_NAME}
)
# -------------------------------------------
ament_package()
      <bash />


      cd ~/ros2_ws
colcon build --packages-select my_cpp_pkg
      <bash />


      cd ~/ros2_ws/install/my_cpp_pkg/lib/my_cpp_pkg
./cpp_node
# you can see that the node runs
- To run that easily
      <bash />


      # on the other terminal
source ~/.bashrc
ros2 run my_cpp_pkg cpp_node # you can see what is in that, if you press tab two times
- Oriented Object Programming Code
      <cpp />


      #include "rclcpp/rclcpp.hpp"

class MyNode : public rclcpp::Node
{
public:
    MyNode() : Node("cpp_test"), counter_(0)
    {
        RCLCPP_INFO(this->get_logger(), "Hello Cpp Node");

        timer_ = this->create_wall_timer(std::chrono::seconds(1),
                                         std::bind(&MyNode::timerCallback, this));
    }

private:
    void timerCallback()
    {
        counter_++;
        RCLCPP_INFO(this->get_logger(), "Hello %d", counter_);
    }

    rclcpp::TimerBase::SharedPtr timer_;
    int counter_;
};

int main(int argc, char **argv)
{
    rclcpp::init(argc, argv);
    // shared pointer is important, because you don't need to use new and delete manually
    auto node = std::make_shared<MyNode>();
    rclcpp::spin(node);
    rclcpp::shutdown();
    return 0;
}
4. OOP C++ Code Template for Nodes
      <cpp />


      #include "rclcpp/rclcpp.hpp"

class MyCustomNode : public rclcpp::Node // MODIFY NAME
{
public:
    MyCustomNode() : Node("node_name") // MODIFY NAME
    {
    }

private:
};

int main(int argc, char **argv)
{
    rclcpp::init(argc, argv);
    auto node = std::make_shared<MyCustomNode>(); // MODIFY NAME
    rclcpp::spin(node);
    rclcpp::shutdown();
    return 0;
}
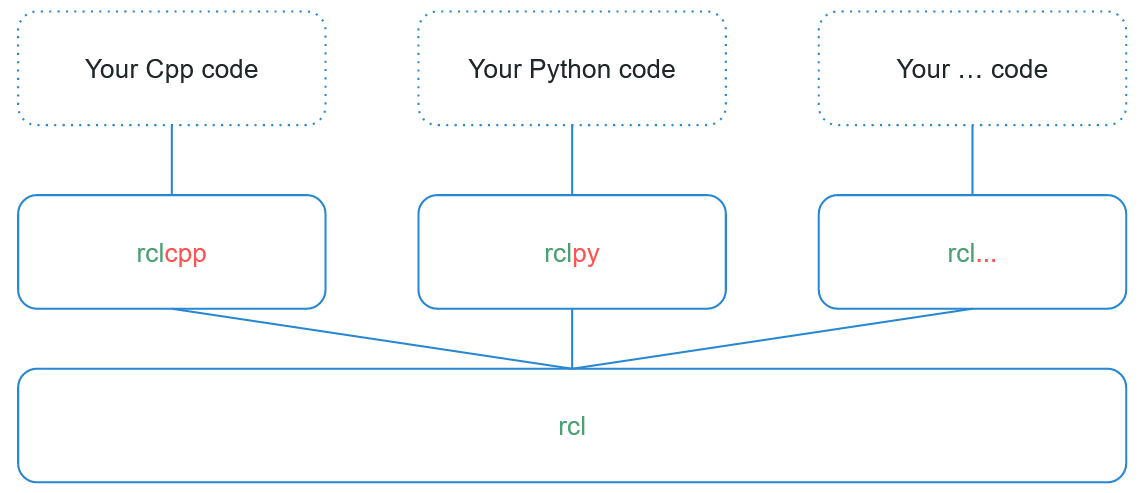
5. ROS2 - Language Libraries

rcl(Ros Client Library) is top of rcl libaray. Also there are many language. For example rcl NodeJS, rcl Java etc.
6. Section Conclusion
In this section you’ve seen how to create your own first ROS2 nodes, in both Python and Cpp. This is already a good foundation. If you read this, then you’ve already made a lot of progress!
Quick recap: Nodes are subprograms in your application. Each node is responsible for only one thing. And nodes communicate between each other through topics, services, and parameters. If you look at the next few sections, well that’s exactly what we’ll work on.
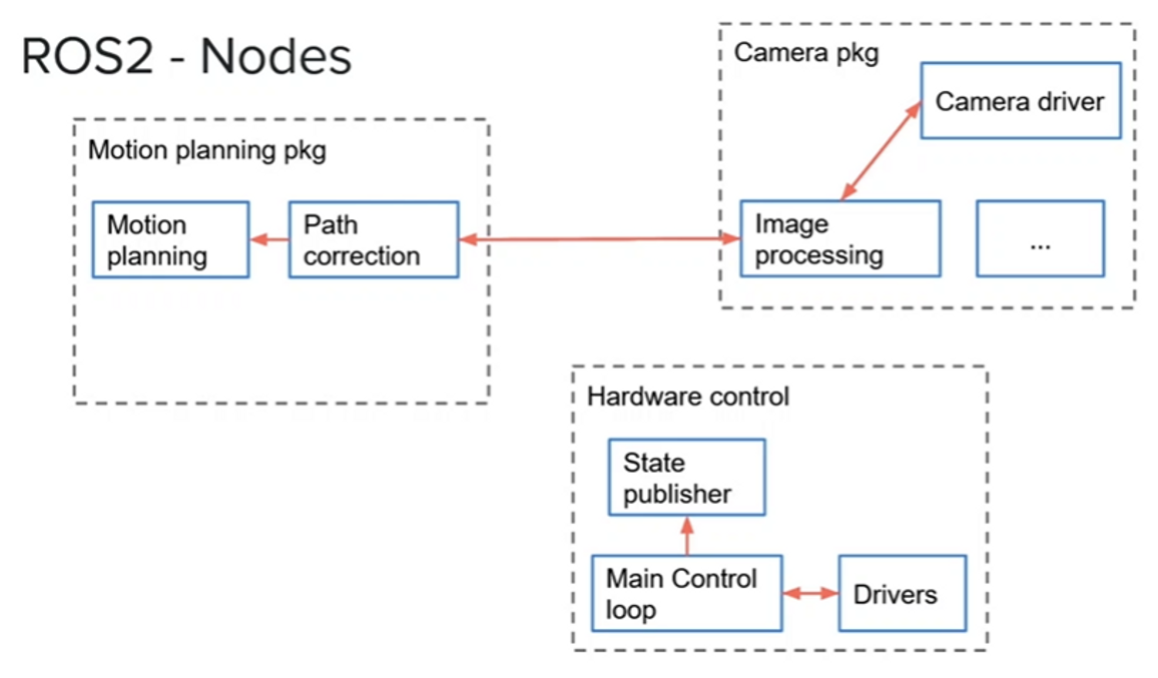
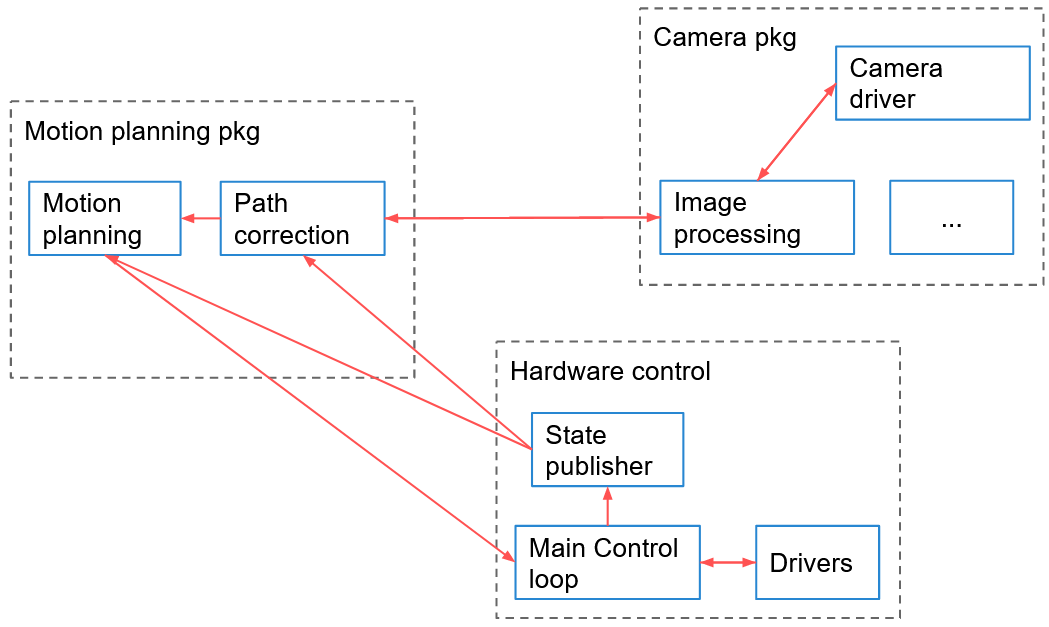
Here’s an example of an architecture for a ROS2 application, where you can see packages and nodes:
Before creating your first node you need to:
- Create a ROS2 workspace and source it.
- Create a (Python/Cpp) package.
Then, you write your node using the appropriate ROS2 client library: rclpy for Python, and rclcpp for Cpp. Both libraries will provide the same core functionalities.
After writing the node, you compile it, and you re-source your environment in order to use it. Nodes are compiled (only for Cpp), and installed (for both Python and Cpp), inside the install/ folder of your ROS2 workspace. You can directly execute them from here, or by using the command line tool “ros2 run <package> <executable>”.
If you don’t understand everything right now, it’s totally OK (and it’s quite normal). ROS concepts are quite hard to grasp the first time. Continue to make progress in the course, and come back to this section later. It will all make sense in the end and you’ll have a solid global overview.
In the next section, you’ll practice a little bit more with nodes, and you’ll discover some useful ROS2 tools. Being comfortable with the tools will help you when working on Topics, Services, etc.
'Robotics > ROS2' 카테고리의 다른 글
| [ROS2 시작하기 - 4] Service (0) | 2023.02.24 |
|---|---|
| [ROS2 시작하기 - 3] Topic (0) | 2023.02.23 |
| [ROS2 시작하기 - 2] Tools (0) | 2023.02.21 |
| [ROS2 시작하기 - 0] 환경 셋팅 (0) | 2023.02.19 |
| ROS2와 DDS란? (0) | 2023.02.18 |